A paper flower backdrop can turn a plain wall into a welcoming photo spot without expensive equipment. The result depends less on perfect petals than on a stable base, balanced colors, and thoughtful placement. How to create a photo booth backdrop with paper flowers? This guide explores seven practical ways, from selecting a sturdy support to arranging blooms for depth and visual balance.
Start with the room and the photos you want to take. A narrow wall may suit a compact flower cluster, while a wider space can hold a fuller design. Consider lightweight paper, removable fasteners, and a clear area for guests to stand. For example, pair large crepe-paper blooms with smaller tissue-paper flowers, then leave a little breathing room around the center. Small details matter.
The ideas ahead offer options for different skill levels and budgets, including simple garlands, layered arrangements, and color-focused designs. You will also find practical reminders about measuring the backdrop, testing attachment points, and checking how the flowers look in the room’s lighting. Paper petals can crease, and handmade blooms rarely match perfectly. That is part of their charm, though it can take patience. If an arrangement feels crowded, remove a few flowers and step back before adding more. A quick test photo often reveals spacing problems that are easy to miss by eye. These approaches are flexible, not strict rules; adapt them to your wall, materials, and event.
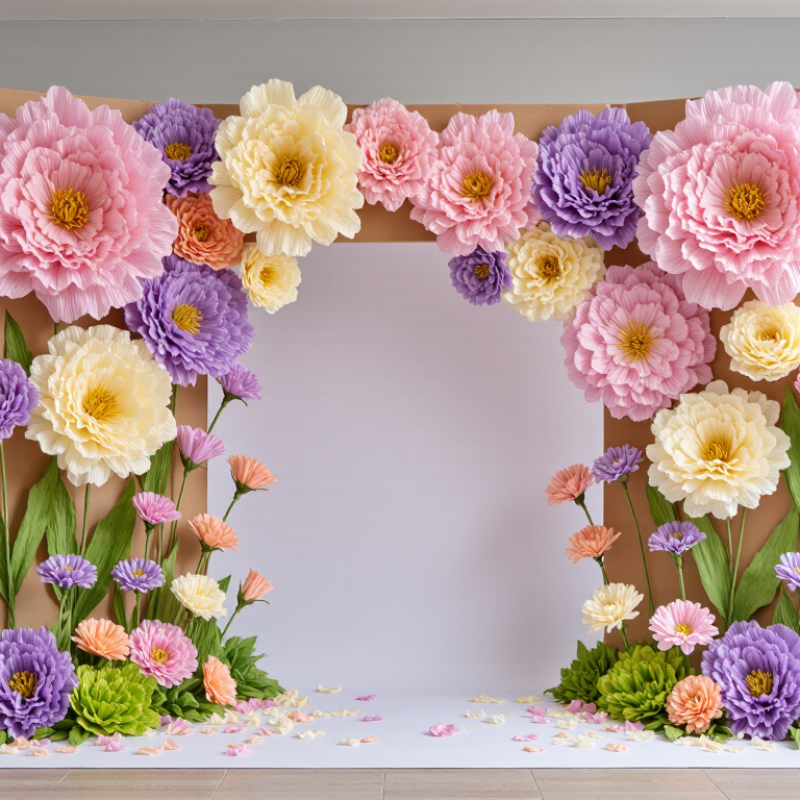
A sturdy base makes paper flowers easier to arrange and less likely to sag during a busy event. Use a freestanding board, a fabric-covered frame, or a clean wall where mounting is allowed. Check that the surface can support your chosen attachments before decorating. Smooth fabric helps paper petals sit flat; textured cloth may catch delicate edges. Keep the backdrop wide enough for two people, with extra space around the sides. Measure the camera frame, not just the wall. That small check saves rework.
Lay out the flowers on the floor before attaching them. Place larger blooms near the corners or along one edge, then fill gaps with smaller flowers and leaves. Leave a calmer area near face height so people do not disappear behind the design. I like an uneven arrangement because it feels less stiff, but uneven can quickly become crowded. Take a test photo from the distance guests will stand, and adjust any flowers that cover faces or create awkward gaps. A few loose petals may curl overnight, so keep spare paper and clips nearby. The layout may need a second look in the actual room. It happens.
Compare the floor area of three common backdrop dimensions when choosing a base for your paper flower layout. Larger backdrops provide more room to arrange flowers around the photo area.
Paper choice sets the backdrop’s texture and how well each flower holds its shape. Cardstock makes firm petals that stay open, but thick sheets can look heavy in close-up photos. Tissue paper creates soft, airy blooms and works well for large flowers; handle it gently, since creases show easily. Crepe paper stretches around curved petals, giving them a more natural, layered look. A useful test is to make one sample flower from each paper before cutting a full batch. Small differences matter.
Choose a palette that works with clothing and the room’s lighting. Two main colors, plus one accent, usually keep the wall from looking busy. Warm pinks and creams feel soft, while deep blue or rust can add contrast against a pale wall. Check a paper sample under the actual lights; a color that looks rich by a window may appear dull indoors. Flower styles also affect the mood. Layered roses add depth, while simple daisies create a playful pattern. Combine large blooms with smaller flowers and a few leaves to fill gaps. Not perfectly uniform. Slight differences in petal size can make the display feel more handmade, though uneven spacing may leave awkward bare spots in photos.
Varying flower shapes and sizes gives a photo booth backdrop depth without making every bloom compete for attention. Cut large, rounded petals from lightweight paper for dahlias, then curl each petal gently around a pencil. For roses, use a loose spiral cut from a circle and roll it inward. Small five-petal flowers work well as fillers. Try mixing blooms from about 4 to 12 inches across; these are practical craft proportions, not strict rules. Leave some petals imperfect. A slightly crooked edge can look more natural than a perfectly repeated shape.
Layer two or three petal sizes in each flower, shifting their centers so the edges remain visible. For a sturdy focal bloom, use heavier cardstock for the base and lighter paper for curled petals. Very thick paper can resist shaping, though; I have found that out the hard way. Use reclaimed sheets for test cuts and hidden layers. The U.S. Environmental Protection Agency reported that 68.2% of paper and paperboard was recycled in 2018, in its Advancing Sustainable Materials Management report. That figure supports paper recovery, not any particular craft method, but it is a useful reminder to save clean offcuts. Arrange the largest flowers at eye level, then tuck smaller ones around them. Step back often. The spacing may still feel a little uneven, and that can be part of the charm.
Planning guide for an approximately 8 × 8 ft (2.4 × 2.4 m) backdrop. Flower counts are estimates for medium coverage and will vary with flower size, spacing, and how much of the backdrop you leave visible.
| # | Backdrop idea | Flower shape and finished size | Suggested paper | Estimated quantity | Making and placement tip |
|---|---|---|---|---|---|
| 1 | Layered rosette wall | Accordion-folded rosettes, about 8–16 in (20–41 cm) across | Lightweight crepe or tissue paper | About 35–50 rosettes | Alternate large and small rosettes. Fan-fold paper strips, secure the center, and spread the folds into a circle. |
| 2 | Oversized peony focal points | Full, rounded layers, about 14–24 in (36–61 cm) across | Crepe paper for shaped petals; cardstock for a sturdy center | About 8–12 large flowers, with smaller accents | Cut several petal sizes, gently cup or curl them, and layer from small petals in the center to larger petals outside. |
| 3 | Daisy and sunflower mix | Flat, distinct petals, about 6–14 in (15–36 cm) across | Cardstock or heavier craft paper | About 20–30 flowers | Cut petal layers in different lengths and pair them with contrasting circular centers. Place a few large blooms at eye level. |
| 4 | Rolled rose clusters | Spiral, layered blooms, about 3–8 in (8–20 cm) across | Cardstock or medium-weight craft paper | About 40–60 small and medium roses | Cut a spiral with a scalloped or gently wavy edge, roll from the outside inward, then let the shape loosen slightly before securing it. |
| 5 | Fringed chrysanthemum texture | Dense, narrow petals, about 5–12 in (13–30 cm) across | Tissue or lightweight crepe paper | About 25–40 flowers | Fringe long paper strips without cutting through the edge, roll them tightly, and fluff the fringe to create volume. |
| 6 | Lotus-inspired layered blooms | Pointed, cup-shaped layers, about 8–16 in (20–41 cm) across | Crepe paper or flexible craft paper | About 12–20 flowers | Use several petal layers, curling the tips outward. Mount with the center slightly raised so the petals form a visible cup. |
| 7 | Mixed-size floral clusters | A mix of rosettes, roses, and broad-petal flowers, about 3–24 in (8–61 cm) across | Combine cardstock, crepe, and tissue paper | About 30–45 flowers across several sizes | Arrange blooms in groups of three to five. Use the largest flowers as anchors, medium flowers to connect them, and small flowers to fill gaps. |
Assembly note: Test your attachment method on the backdrop material before decorating. Keep heavier flowers near the support points, and leave a clear central area if guests will stand in front of the display.
Arrange the largest paper flowers first, spacing them across the backdrop rather than clustering them in one corner. Step back often. A quick phone photo can reveal gaps that disappear when you stand close. Place medium blooms between large ones, then use small flowers to soften empty spaces. Keep some open areas; a wall covered edge to edge can feel crowded in photographs.
Build depth by layering flowers at different heights and angles. Let a few petals extend outward, while others sit flatter against the board. Use removable hooks, floral wire, or low-temperature glue suited to your backdrop material. Test each attachment with a gentle tug before adding more weight. Lightweight paper holds best. Heavy decorations may sag or pull the surface loose.
Balance does not mean perfect symmetry. Try a fuller cluster on one side, then add a smaller group opposite it to steady the composition. I sometimes overfill the center, and the camera makes that mistake look worse. Move back, check the frame, and adjust one flower at a time. Keep the lower edge clear if guests will stand in front; otherwise, petals can bend or catch on clothing.
Once the paper flowers are attached, step back and inspect the backdrop from several feet away. Look for gaps, bent petals, or places where the mounting surface shows through. Add a few smaller blooms to soften empty areas, but leave some breathing room. Too many flowers can make the display feel crowded. Gently lift flattened petals with clean fingers, and secure any loose edges before guests arrive.
Check that the backdrop stands straight and cannot wobble when someone moves nearby. Place it away from strong drafts and direct sunlight, which can curl paper or create harsh shadows. A little unevenness may remain; I once adjusted a flower for too long and made its center look less natural. Small flaws are not always worth fixing.
For photographs, position the main light slightly to one side of the camera. This brings out the petal layers without leaving deep shadows between them. Take a test photo, then check the corners for clutter and the background for visible tape or supports. Move the camera back until full outfits fit in the frame, and mark the standing spot with a small piece of removable floor tape. Keep a few spare flowers and fasteners nearby. Just in case.
Mix blooms about 4 to 12 inches across. These are useful proportions, not strict rules.
Curl each petal gently around a pencil. For a rose, roll a loose spiral cut from a paper circle. Keep it gentle.
Layer two or three petal sizes, shifting their centers so the edges show. Slightly crooked petals can look more natural.
Heavier cardstock makes a sturdy flower base. Lighter paper curls more easily, while very thick sheets can resist shaping.
Use clean offcuts for test cuts or hidden layers. Save the useful pieces.
Place the largest blooms near eye level, then fill around them with smaller flowers. Leave some open space; crowded displays can feel busy.
Look for gaps, flattened petals, loose edges, and visible supports. Make sure the display stands straight and does not wobble. Some unevenness may be fine.
Place the main light slightly to one side of the camera. Take a test photo, check the corners, and move back until full outfits fit. Mark the standing spot with removable floor tape. Keep spare flowers nearby.
How to create a photo booth backdrop with paper flowers? Start by choosing a sturdy backdrop base that suits your space, then sketch a simple layout to guide the placement of flowers. Select paper types, colors, and flower styles that complement one another and fit the mood of your event. Mixing shades and textures can make the display feel more lively, while a coordinated palette keeps it visually balanced.
Create flowers in a variety of shapes and sizes, using larger blooms as focal points and smaller ones to fill gaps. Arrange them across the backdrop with attention to depth, spacing, and balance, then secure each piece firmly so the display stays in place. Finally, add finishing touches, check the backdrop from the camera’s viewpoint, and make sure the lighting and open space are suitable for photos. A thoughtful layout and careful preparation can turn simple paper flowers into a colorful, inviting photo area.
Arden Decor